


On April 3rd, Kingman will be releasing two new paintball hand guns mainly intended for use in training atmospheres. The Kingman Eraser and Chaser use 11mm (.43 caliber) paintballs and 12 gram CO2 cartridges as their air source.
Kingman Training applies the latest patent pending paintball technology into this new life-sized marker. The KT marker delivers a true simulated weight and feel, comparable to a real hand pistol. Each “magazine” holds 10 paintballs and shoots up to 300 feet per second. Each 12 gram CO2 cartridge can shoot 4 “magazines”.
The KT marker will provide flawless performance, with increased accuracy and distance. This marker is perfect for recreational simulated environments and Military, Security, or S.W.A.T. training practice. -KingmanTraining.com
Kingman plans on releasing the Chaser and Eraser in 2009. No specific date is know at this time.
Compared to real hand guns, the Kingman Chaser and Eraser are now, most likely, the most "life-like" paintball guns in the consumer market.
Yea yea, like you need another someone to tell you which paintball mask to buy now. Well that's not true in this case. My job in this post is to simply inform you of the different features and flaws all the different paintball masks on the market have to offer.
Read the rest of this entry »
I had the pleasure to speak to Craig Miller, Senior VP of Procaps and DraXxus paintball, as well as VP of the newly formed Paintball Sports Trade Association. The PSTA has one clear mission: Increase the awareness, acceptance, and participation of Paintball all over the world. We asked Craig some questions that might help clarify what the PSTA's purpose is.
Q: What is the ultimate purpose/goal of the PSTA?
Craig: The Mission Statement says it best: "To increase the awareness, acceptance, and participation in Paintball around the world".
Q: How was it started and who's idea was it?
Craig: It began in a Disney's Wide World of Sports meeting room at the 2005 PSP World Cup. Many people within the industry have conversationally agreed over the years that our industry needs an industry association to promote Paintball to the world at large, and to be a clearinghouse for information on the game, on safety, on best practices, and Paintball in general. Most industries and sports have associations that do all of these things, and now finally, Paintball joins the ranks of Baseball, Football, Basketball, Rugby, Soccer, Hockey, etc., with an industry association to promote the safe growth of our great game.
Q: Who's allowed to become a member?
Read the rest of this entry »

I had the awesome privilege of interviewing one of the very first female paintballers, Bea Youngs. One of the most successful and worldwide known female paintballer, Bea is known as paintball's best ambassador. Bea started training on an all-girl tournament paintball team (Femmes Fatale) in August 2000. She's even featured in the highly acclaimed game, Greg Hastings Tournament Paintball.
I asked Bea a few general and a few specific questions...
Kyle: How did you get introduced to the sport of paintball?
 I was asked by Tami Adamson to play tournament paintball with her and form an all-female team, Femmes Fatale. We became the first all-female team to play on airball concept fields since the Iron Maidens in the woods.
Kyle: What was your first paintball gun?
A borrowed autococker and then my first gun that I owned was a Smart Parts Impulse.
.
Kyle: In your paintball career, what was your most memorable moment? This doesn't have to be a game necessarily, it could include any jobs you've done or event you've attended.
Memorable? Winning the San Diego Super 7 Championship last year (2006) and making history as the first co-ed team full of mostly females to win a championship title and to finish the season in 2nd place out of the 102 teams in Division 2 throughout the 06 season.
Kyle: Bea, as a professional woman paintballer, how would you define a "successful paintballer"?
True spirit and perseverance. Your heart has to be in the right place and you have to give back to the entity that is giving to you. In this case, the things I do in the sport like writing, commentating, hosting tv shows for the sport, working for my sponsors at major trade show events, helping other kids get started in the tournament scene through my team, Destiny, and being a voice at major events like the PSP on the microphone all contributes to paintball. If you live by the Golden Rule (Do Unto Others as you would have them Do Unto You), in the end, you will get what you deserve based on the works you do. Showing appreciation and being willing to share your knowledge and love of the sport to others, or just passing it forward, goes a long way and makes for a successful player. Teaching what you know makes you a better player. Practicing and studying the sport also helps tremendously.
Kyle: As one of the most influential female paintballers, what do you see for the future regarding woman in the sport of paintball? To the best of your knowledge, are there any plans in the future for an All-Girls division or do you believe it will be mostly male oriented?
The future of women in the sport is bright as long as females try to work as hard, and sometimes even harder, than the average male. This sport is male-dominated and will be for a long time, and we have to prove to our male counterparts that we can compete. To compete, we have to practice and be able to take constructive criticism. To get support, we can't expect that by just putting on a happy face, it will get us what we need to play. Sponsors are starting to only support those teams that are serious and have a winning record, or a good reputation, for that matter. I'm not saying it's not a good thing to be "good-looking" and get that sponsorship, but I'm saying even if you are a "hottie", back it up with some skills and be respectful of those males that may have a chip on their shoulder.
Kyle: What is the best paintball marker you've ever owned?
Oh wow... that's a tough one. I would have to say it's between Planet Eclipse's 06 Ego and the new Bob Long Guns. This season, we're shooting the new Bob Long guns (Marq 6, Marq 7, Rapper), though, and so far, it's been one of the best and fastest shooting markers on the market. So, it's a toss up between the Egos and the BL's.
Kyle: What is the WORST paintball marker you've ever owned (be honest)?
Worst? Oh wow. Honestly, I had some issues with my Smart Parts Impulse back in the day, but when I got it upgraded to the Impulse Vision, it shot much better.
Kyle: What was your family's first reaction when you told them you were going to be in a video game?
My brother got his camera out and started taking pictures of the tv screen! My parents still to this day have no idea what I'm doing in the sport. They have yet to go to a paintball event to see me play. They think I'm crazy and I'm wasting my time in the sport and wasting two degrees I earned from Florida State and the University of Florida by working in the industry. One of these days, they'll get it.
Kyle: Paintball in the Olympics, do you think it will happen?!
Sure, why not. If they can have curling in the sport, they can have paintball. As long as enough countries in the world adopt paintball as a legit sport and then maybe a change for the better in the format to make it more understandable (as if curling is understandable), then the likelihood of it being in the Olympics could happen. Anything's possible.
Kyle: Thank you again, Bea, for taking some time to answer these questions that I, and I'm sure others, would like to ask you.
You can read more about Bea Youngs at her website, BeaYoungs.com
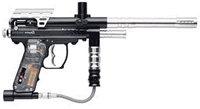
Kingman Spyder Paintball Gun Trigger Mods
Buy Spyder Paintball Guns - Cheap!
 There are many areas for improvement for in the trigger region on the Spyder. First is the stroke length of the stock setting. Stock this trigger travel is set to about 1/4" long. This is far too long to "walk" the trigger. Most of your energy is spent bringing the trigger through it’s travel to contact the trigger switch in the frame. We are going to change this with this mod. And make this trigger much easier to "walk" essentially making the semi-auto mode much faster than stock. With practice you will be able to get this gun to do about 13-15 BPS after just the adjustment. In levels 2 and 3 you could also change to a sweet spot trigger which has the center hump omitted on the trigger so the face of the trigger is smooth from top to bottom. The reasoning behind a sweet spot trigger is that some of your trigger action is eaten by your finger taking the time and distance to travel to the center of each of the trigger depressions. With a sweet spot trigger this is not a factor. This mod can be done in several levels. We will cover all of these levels to give you complete tutorial on how do perform each of these levels.
 * Level 1 : Adjust the trigger throw. * Level 2 : Completely remove the trigger return spring altogether. * Level 3 : Change out the stock trigger switch to a lighter switch to make the trigger even easier to "walk".
DISCLAIMER: Before proceeding with any of these mods please remember that all safety rules apply. Do not attempt to work on your marker gassed up or loaded, this can result in serious injury. Marker Mods in whole or part is not responsible for damage you may cause to your marker, your person, or your belongings by you performing one or any of the below mods to your paintball marker. When removing roll pins always take care to recognize which end of the pin is the "starred" retainer and make sure to drive form the other side. Also try not to remove roll pins more than twice. If this must be done use a drop of red loctite on the head of the pin to lock it in the body.
Level 1: Adjust the trigger throw.
Tools needed for trigger adjustment.
* Phillips screw driver * Allen wrench that fits the frame screws * Time involved: 10-15 minutes Difficulty: Easy
This is fairly easy mod to do and will give you results immediately that you will notice. At the stock setting the trigger pull is far too long in fact. Most of the trigger time on a stock trigger is spent taking up the excess trigger travel.
1. Remove the trigger frame 2. Adjust trigger travel 3. Test fit trigger frame to marker 4. Install trigger frame and test marker in safe zone
STEP 1
Remove the trigger frame
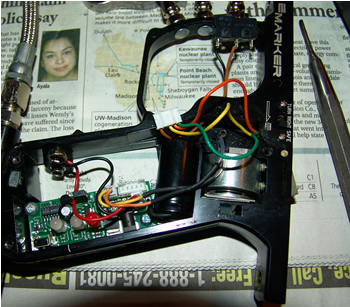
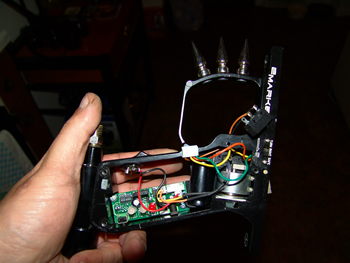
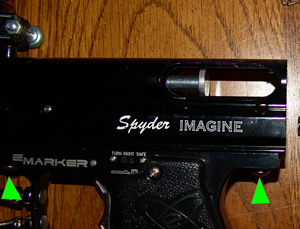 Remove the trigger frame screws at the green arrows. These should come loose with minimal effort. When re-installing these take care not to cross thread them. The rear block and velocity adjuster on Spiker were removed as well as the bolt and all of the internals when we did this mod. You DO NOT have to remove the internals to do this mod. It does not make the job easier or harder.
Go to the spring removal if you are intending to do level 2 mod
STEP 2
Adjust trigger travel
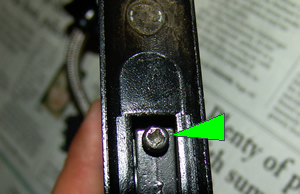 Be sure to support the trigger away from the trigger switch as you could easily damage the switch by having the trigger mash down on the switch. Turn the screw at the green arrow counter-clockwise (loosen) about 1/4 turn. Go in very small increments as this adjustment goes a very long ways.
STEP 3
Test fit frame to marker
Now trial fit the frame to the marker body without the retaining screws. Make sure the frame is seated all the way to the body and hold it tight to the body with your thumbs.
As you are fitting the frame to the body look at the distance between the back of the trigger and switch. You want the trigger to rest on the switch but not actuate it. If this is adjusted too far you will have a trigger that will not reset after being fired so pay close attention here.
Hint: Listen for the click from the switch. The stock switch detent is pretty loud. This is a good indicator that you have adjusted the trigger too far. Turn the adjustment screw back in a little bit and re test fit.
STEP 4
Install trigger frame and test marker in safe zone
Install the trigger frame and then test fire the marker in a safe zone. Follow all of the safety rules that apply. If done correctly you will find the trigger is far more sensitive that you were used to.
Level 2: Completely remove the trigger return spring.
Tools needed for trigger adjustment.
* Pin punch * Allen wrench that fits the frame screws * Time involved: 20-25 minutes Difficulty: Intermediate
STEP 1
Remove the trigger frame
Remove the trigger frame screws at the green arrows. These should come loose with minimal effort. When re-installing these take care not to cross thread them. The rear block and velocity adjuster on Spiker were removed as well as the bolt and all of the internals when we did this mod. You DO NOT have to remove the internals to do this mod. It does not make the job easier or harder.
STEP 2
Using a punch removed both switch roll pins and then the trigger roll pin.
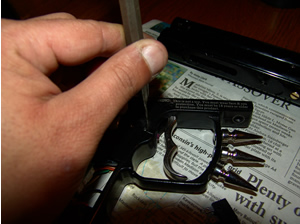 Before removing the roll pins make sure you are going to drive it out the correct side. Look closely at the roll pin head. There should be no grooves on the side that you are driving. Remove the 2 roll pins that hold the switch and the one that holds the trigger. Make sure the frame is on a surface such as our padded newspaper so that the frame is not marked.
Step 3
Lift out the trigger and spring through the top of the frame. Keep the spring just incase you want to go back to the spring later. At this point you have the option to install a thin washer on one side of the trigger at the pivot point between the trigger and the frame to remove side to side play in the trigger. This is completely optional and a matter of preference.
Step 4
reassemble the trigger into the frame. Make sure to push the roll pin in until only the starred retainer end is sticking out of the frame. NEVER hammer on this pin before this point. If the pin is sticking out further it will damage your marker frame when you begin pounding it in.
Step 5
Reinstall trigger frame and re-test trigger actuation. This may require some adjustment again but should not.
Level 3: Swap out stock trigger switch to lighter switch.
Tools needed for trigger adjustment.
* Pin punch 1/8" * Small hammer * Soldering iron and 60/40 solder (NON-ACID TYPE) * Time involved: 25-30 minutes Difficulty: Advanced * 50 gram switch
We purchased our switch from an eBay seller pipemaster2003. The switch sold for $5.50 with free shipping. The transaction was fast. This seller was really on the ball. After auction closing we received our switch in a small package that was well packed. We opened the goods like kids in a candy store with ear to ear grins. We decided to go with our own knowledge of the removal and install for the switch rather than use the included well written instructions. I guess we have some aversion to instructions.
So the steps we followed are listed below. Look at these directions first to decide if you are up to this before beginning the modification.
1. Removed bottom line from the ASA. 2. Removed both of the trigger frame screws. 3. Removed both right and left grips. 4. Unplugged the battery 5. Unplugged the switch wiring group form the board. 6. Using a punch removed both switch roll pins and then the trigger roll pin. 7. Slipped trigger out of frame assembly. and then pulled switch and attached wires out of the frame about 1 1/2" to make it easier to work on. 8. Make notes as to which wire is on which tab on the stock switch. 9. Removed the wires from the tabs with a soldering iron. 10. Then re-soldered the wires to the new switch on their respective tabs. 11. Push the switch back into the frame making sure not to pinch any wires and lined up the roll pin holes. 12. Installed the switch roll pins and then the trigger with roll pin 13. Tested loose trigger action to make sure everything moved smoothly 14. Re-installed trigger frame to main body. 15. Re-installed bottom line to ASA 16. Powered up and gassed up marker 17. Checked for leaks 18. Tested marker in safe zone.
STEP 1
Remove bottom line from ASA adapter
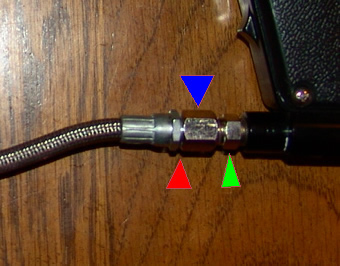 Be gentle in this region as it is easy to cause damage quickly. A small drop of oil should be added to the line pivot at the red arrow. This will allow the line to turn easier. Remove the line turning the nut at the blue arrow. If need use a wrench to hold the adapter at the green arrow still. DO NOT use pliers to loosen this connection as it is easily marked up by pliers and may result in random sharp edges on the flat parts of the nut.
STEP 2
Remove Trigger frame screws.
Remove the trigger frame screws at the green arrows. These should come loose with minimal effort. When re-installing these take care not to cross thread them. The rear block and velocity adjuster on Spiker were removed as well as the bolt and all of the internals when we did this mod. You DO NOT have to remove the internals to do this mod. It does not make the job easier or harder.
Make sure to keep these screws where you can find them. Nothing makes a killer mod go bad faster than having to make a run to the hardware store and find a replacement part.
STEP 3
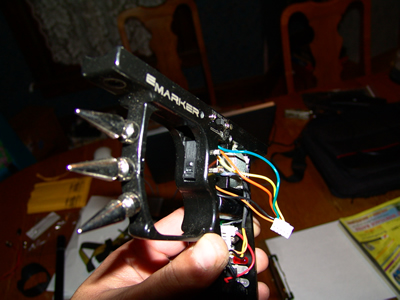
Remove both right and left grips.
 It is important to remove both grips on this mod to allow the trigger switch roll pins to come out completely. Both grips cover about 1/2 of the pin head. Attempt to push these out without removing both grip will result in damaged grips.
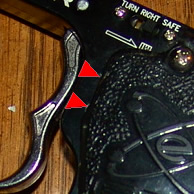 See the red arrows in the picture, you see you can barely see the heads of the roll pins. This is why both grips must be removed to complete this job.
STEP 4
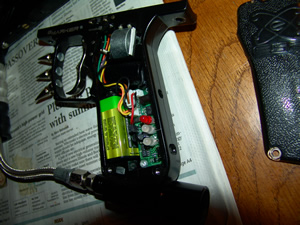
Unplug the battery
This is self explanatory. Remove the battery as you will need the space to work with. Also never work on any of the electronics of your marker with the battery in place.
STEP 5
Unplugged the switch wiring group form the board.
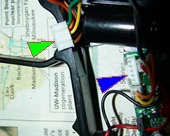 By unplugging the switch harness (green arrow) from the board (red arrow) it allows you almost two more inches of workspace when soldering. This is important as solder can fall onto other electronics ruining the board.
STEP 6
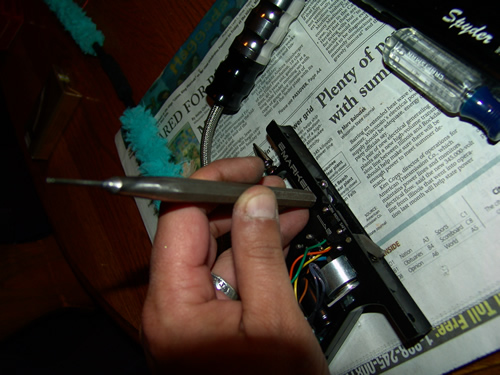
Using a punch removed both switch roll pins and then the trigger roll pin.
Before removing the roll pins make sure you are going to drive it out the correct side. Look closely at the roll pin head. There should be no grooves on the side that you are driving. Remove the 2 roll pins that hold the switch and the one that holds the trigger. Make sure the frame is on a surface such as our padded newspaper so that the frame is not marked.
Make sure you use the right size roll pin punch. If your punch is too large you can downsize it a bit to match the pin. You want a punch that is slightly smaller than pin.
Look for these retaining ribs on the heads. If you can see these ribs then drive the pin from the other side.
Driving pins through from this side will damage your marker.
STEP 7
Slipped trigger out of frame assembly. and then pulled switch and attached wires out of the frame about 1 1/2" to make it easier to work on.
With the switch pulled out it is easier to work.
STEP 8
Make notes as to which wire is on which tab on the stock switch.
As you can see on ours the brown is center and black is the lower one.
STEP 9
Removed the wires from the tabs with a soldering iron.
STEP 10
 Then re-soldered the wires to the new switch on their respective tabs. Here the is the new 50 mgram switched installed. We are almost there…
STEP 11
Push the switch back into the frame making sure not to pinch any wires and lined up the roll pin holes.
STEP 12
Installed the switch roll pins and then the trigger with roll pin
 Make sure the roll pins go in until the ribbed retaining part is the only part sticking out. DO NOT pound on these pins until they are in this far. Misalignment and force could result a destroyed trigger frame.
Use the large end of the punch to make sure that the pin is not driven past the flush to body point. This will ruin the frame so please take care when doing this particular step.
Step 13
Tested loose trigger action to make sure everything moved smoothly
Step 14
Installed battery, plug in switch harness, grips and Re-installed trigger frame to main body.
Step 15
Re-installed bottom line to ASA.
Step 16
Powered up and gassed up marker.
Step 17
Checked for leaks.
Step 18
Tested marker in safe zone.
Conclusion: This trigger is awesome! it is 50 gram switch which will work just fine without the trigger spring installed. With this trigger switch installed it was much easier to walk the trigger on "Spiker" our test platform marker. With the first test run Spiker performed well. On the second one we had to re-open the grip and double check the plug in on the switch harness. A little wiggle to seat it all the way down and we were on our way. Now this trigger will not make you an overnight machine gunner. But it will be close. You will still have to practice with the trigger to get the feel for it. First test run Spiker did 15 BPS. Incredible results we think for the measly $5.50 it cost us.
One last insane trigger mod…….
As a final touch we are presently testing out setting up the marker to fire once and pull and once on release. Effectively getting two shots for the same action as one. While this is completely illegal for tournaments and also at some fields it will prove to be quite the asset in outlaw woods ball. This last mod makes use of a pressure switch to activate the circuitry and a jumper using the open tab on the trigger switch. We will post the mod here once we can get reliable results from it and can fully explain how this last piece of voodoo works. Because of stock board limitations we may hit the limit of what the board can do. Official word from Kingman International is that the stock board is uncapped in semi auto mode with the tourney lock on (jumper removed). We will see and let you know.
Keep it real, keep it safe
Posted in News | No Comments » Buy New & Used Paintball Guns