


Have you ever wanted to convert your Tippmann X7, or any paintball gun for that matter, into a fully functional laser-activated killing machine? Who hasn't? Team Cynergy, a central New Jersey paintball team, made a video tutorial on how to use a Red Dot laser sight with a Tippmann X7 so that every time the laser beam is crossed, the paintball gun is fired. Everything needed to make this mod for yourself can be purchased at your local Radio Shack (except for the laser sight and gun). Sweet huh?
The tutorial can get a little complicated as it uses microcontrollers (circuit boards), and the code is written with the P BASIC 2.5 programming language (don't worry, I've never heard of it either).
Read the rest of this entry »
The Kingman Spyder is the most popular paintball gun on the market. It has been for the last decade. Why is this? It’s not because it has the fastest ROF (rate of fire) record, or the best beam-breaking eyes… It’s because of its upgrade availability. Kingman Spyders have that unique capability to have the crap kicked out of it and still shoot fine the next day. Because of this, creative paintballers have gone to work, trying to find some way to get tweak or mod the gun to get the best bang for their buck. We’ve published a trigger mod mod for the Kingman Spyder. The mod is applicable to most of the Spyders available on the market right now. It’s fairly simple, and its effects are tremendous. It’ll increase your rate of fire up to twice as fast.
Read the Kingman Spyder Trigger Mod
Posted in News | No Comments »Kingman Spyder Paintball Gun Trigger Mods
Buy Spyder Paintball Guns - Cheap!
 There are many areas for improvement for in the trigger region on the Spyder. First is the stroke length of the stock setting. Stock this trigger travel is set to about 1/4" long. This is far too long to "walk" the trigger. Most of your energy is spent bringing the trigger through it’s travel to contact the trigger switch in the frame. We are going to change this with this mod. And make this trigger much easier to "walk" essentially making the semi-auto mode much faster than stock. With practice you will be able to get this gun to do about 13-15 BPS after just the adjustment. In levels 2 and 3 you could also change to a sweet spot trigger which has the center hump omitted on the trigger so the face of the trigger is smooth from top to bottom. The reasoning behind a sweet spot trigger is that some of your trigger action is eaten by your finger taking the time and distance to travel to the center of each of the trigger depressions. With a sweet spot trigger this is not a factor. This mod can be done in several levels. We will cover all of these levels to give you complete tutorial on how do perform each of these levels.
 * Level 1 : Adjust the trigger throw. * Level 2 : Completely remove the trigger return spring altogether. * Level 3 : Change out the stock trigger switch to a lighter switch to make the trigger even easier to "walk".
DISCLAIMER: Before proceeding with any of these mods please remember that all safety rules apply. Do not attempt to work on your marker gassed up or loaded, this can result in serious injury. Marker Mods in whole or part is not responsible for damage you may cause to your marker, your person, or your belongings by you performing one or any of the below mods to your paintball marker. When removing roll pins always take care to recognize which end of the pin is the "starred" retainer and make sure to drive form the other side. Also try not to remove roll pins more than twice. If this must be done use a drop of red loctite on the head of the pin to lock it in the body.
Level 1: Adjust the trigger throw.
Tools needed for trigger adjustment.
* Phillips screw driver * Allen wrench that fits the frame screws * Time involved: 10-15 minutes Difficulty: Easy
This is fairly easy mod to do and will give you results immediately that you will notice. At the stock setting the trigger pull is far too long in fact. Most of the trigger time on a stock trigger is spent taking up the excess trigger travel.
1. Remove the trigger frame 2. Adjust trigger travel 3. Test fit trigger frame to marker 4. Install trigger frame and test marker in safe zone
STEP 1
Remove the trigger frame
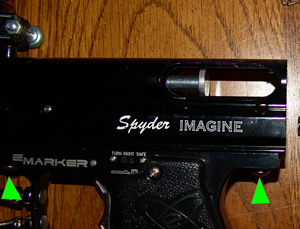 Remove the trigger frame screws at the green arrows. These should come loose with minimal effort. When re-installing these take care not to cross thread them. The rear block and velocity adjuster on Spiker were removed as well as the bolt and all of the internals when we did this mod. You DO NOT have to remove the internals to do this mod. It does not make the job easier or harder.
Go to the spring removal if you are intending to do level 2 mod
STEP 2
Adjust trigger travel
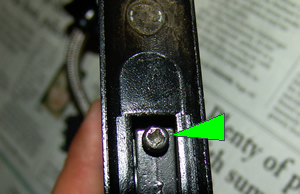 Be sure to support the trigger away from the trigger switch as you could easily damage the switch by having the trigger mash down on the switch. Turn the screw at the green arrow counter-clockwise (loosen) about 1/4 turn. Go in very small increments as this adjustment goes a very long ways.
STEP 3
Test fit frame to marker
Now trial fit the frame to the marker body without the retaining screws. Make sure the frame is seated all the way to the body and hold it tight to the body with your thumbs.
As you are fitting the frame to the body look at the distance between the back of the trigger and switch. You want the trigger to rest on the switch but not actuate it. If this is adjusted too far you will have a trigger that will not reset after being fired so pay close attention here.
Hint: Listen for the click from the switch. The stock switch detent is pretty loud. This is a good indicator that you have adjusted the trigger too far. Turn the adjustment screw back in a little bit and re test fit.
STEP 4
Install trigger frame and test marker in safe zone
Install the trigger frame and then test fire the marker in a safe zone. Follow all of the safety rules that apply. If done correctly you will find the trigger is far more sensitive that you were used to.
Level 2: Completely remove the trigger return spring.
Tools needed for trigger adjustment.
* Pin punch * Allen wrench that fits the frame screws * Time involved: 20-25 minutes Difficulty: Intermediate
STEP 1
Remove the trigger frame
Remove the trigger frame screws at the green arrows. These should come loose with minimal effort. When re-installing these take care not to cross thread them. The rear block and velocity adjuster on Spiker were removed as well as the bolt and all of the internals when we did this mod. You DO NOT have to remove the internals to do this mod. It does not make the job easier or harder.
STEP 2
Using a punch removed both switch roll pins and then the trigger roll pin.
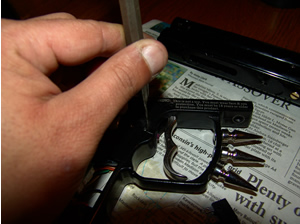 Before removing the roll pins make sure you are going to drive it out the correct side. Look closely at the roll pin head. There should be no grooves on the side that you are driving. Remove the 2 roll pins that hold the switch and the one that holds the trigger. Make sure the frame is on a surface such as our padded newspaper so that the frame is not marked.
Step 3
Lift out the trigger and spring through the top of the frame. Keep the spring just incase you want to go back to the spring later. At this point you have the option to install a thin washer on one side of the trigger at the pivot point between the trigger and the frame to remove side to side play in the trigger. This is completely optional and a matter of preference.
Step 4
reassemble the trigger into the frame. Make sure to push the roll pin in until only the starred retainer end is sticking out of the frame. NEVER hammer on this pin before this point. If the pin is sticking out further it will damage your marker frame when you begin pounding it in.
Step 5
Reinstall trigger frame and re-test trigger actuation. This may require some adjustment again but should not.
Level 3: Swap out stock trigger switch to lighter switch.
Tools needed for trigger adjustment.
* Pin punch 1/8" * Small hammer * Soldering iron and 60/40 solder (NON-ACID TYPE) * Time involved: 25-30 minutes Difficulty: Advanced * 50 gram switch
We purchased our switch from an eBay seller pipemaster2003. The switch sold for $5.50 with free shipping. The transaction was fast. This seller was really on the ball. After auction closing we received our switch in a small package that was well packed. We opened the goods like kids in a candy store with ear to ear grins. We decided to go with our own knowledge of the removal and install for the switch rather than use the included well written instructions. I guess we have some aversion to instructions.
So the steps we followed are listed below. Look at these directions first to decide if you are up to this before beginning the modification.
1. Removed bottom line from the ASA. 2. Removed both of the trigger frame screws. 3. Removed both right and left grips. 4. Unplugged the battery 5. Unplugged the switch wiring group form the board. 6. Using a punch removed both switch roll pins and then the trigger roll pin. 7. Slipped trigger out of frame assembly. and then pulled switch and attached wires out of the frame about 1 1/2" to make it easier to work on. 8. Make notes as to which wire is on which tab on the stock switch. 9. Removed the wires from the tabs with a soldering iron. 10. Then re-soldered the wires to the new switch on their respective tabs. 11. Push the switch back into the frame making sure not to pinch any wires and lined up the roll pin holes. 12. Installed the switch roll pins and then the trigger with roll pin 13. Tested loose trigger action to make sure everything moved smoothly 14. Re-installed trigger frame to main body. 15. Re-installed bottom line to ASA 16. Powered up and gassed up marker 17. Checked for leaks 18. Tested marker in safe zone.
STEP 1
Remove bottom line from ASA adapter
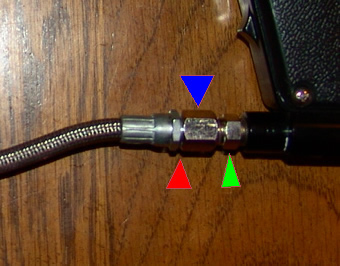 Be gentle in this region as it is easy to cause damage quickly. A small drop of oil should be added to the line pivot at the red arrow. This will allow the line to turn easier. Remove the line turning the nut at the blue arrow. If need use a wrench to hold the adapter at the green arrow still. DO NOT use pliers to loosen this connection as it is easily marked up by pliers and may result in random sharp edges on the flat parts of the nut.
STEP 2
Remove Trigger frame screws.
Remove the trigger frame screws at the green arrows. These should come loose with minimal effort. When re-installing these take care not to cross thread them. The rear block and velocity adjuster on Spiker were removed as well as the bolt and all of the internals when we did this mod. You DO NOT have to remove the internals to do this mod. It does not make the job easier or harder.
Make sure to keep these screws where you can find them. Nothing makes a killer mod go bad faster than having to make a run to the hardware store and find a replacement part.
STEP 3
Remove both right and left grips.
 It is important to remove both grips on this mod to allow the trigger switch roll pins to come out completely. Both grips cover about 1/2 of the pin head. Attempt to push these out without removing both grip will result in damaged grips.
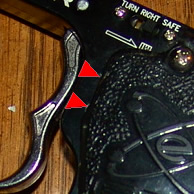 See the red arrows in the picture, you see you can barely see the heads of the roll pins. This is why both grips must be removed to complete this job.
STEP 4
Unplug the battery
This is self explanatory. Remove the battery as you will need the space to work with. Also never work on any of the electronics of your marker with the battery in place.
STEP 5
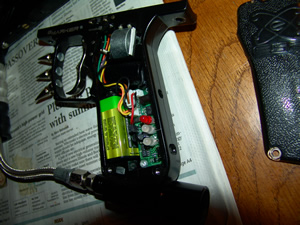
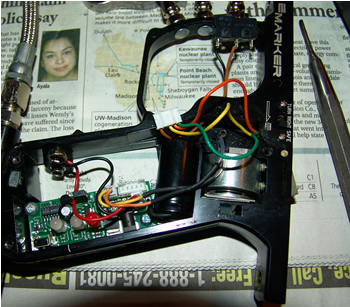
Unplugged the switch wiring group form the board.
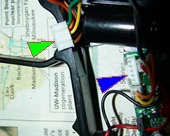 By unplugging the switch harness (green arrow) from the board (red arrow) it allows you almost two more inches of workspace when soldering. This is important as solder can fall onto other electronics ruining the board.
STEP 6
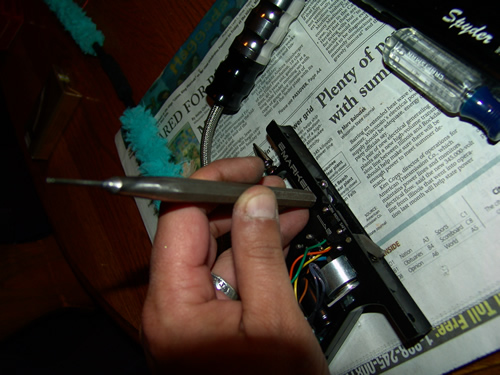
Using a punch removed both switch roll pins and then the trigger roll pin.
Before removing the roll pins make sure you are going to drive it out the correct side. Look closely at the roll pin head. There should be no grooves on the side that you are driving. Remove the 2 roll pins that hold the switch and the one that holds the trigger. Make sure the frame is on a surface such as our padded newspaper so that the frame is not marked.
Make sure you use the right size roll pin punch. If your punch is too large you can downsize it a bit to match the pin. You want a punch that is slightly smaller than pin.
Look for these retaining ribs on the heads. If you can see these ribs then drive the pin from the other side.
Driving pins through from this side will damage your marker.
STEP 7
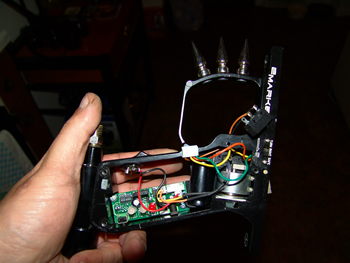
Slipped trigger out of frame assembly. and then pulled switch and attached wires out of the frame about 1 1/2" to make it easier to work on.
With the switch pulled out it is easier to work.
STEP 8
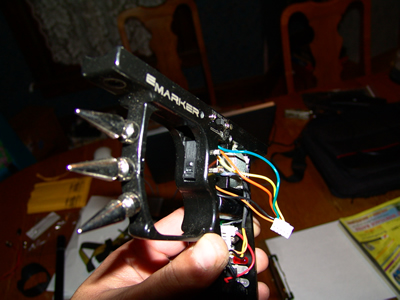
Make notes as to which wire is on which tab on the stock switch.
As you can see on ours the brown is center and black is the lower one.
STEP 9
Removed the wires from the tabs with a soldering iron.
STEP 10
 Then re-soldered the wires to the new switch on their respective tabs. Here the is the new 50 mgram switched installed. We are almost there…
STEP 11
Push the switch back into the frame making sure not to pinch any wires and lined up the roll pin holes.
STEP 12
Installed the switch roll pins and then the trigger with roll pin
 Make sure the roll pins go in until the ribbed retaining part is the only part sticking out. DO NOT pound on these pins until they are in this far. Misalignment and force could result a destroyed trigger frame.
Use the large end of the punch to make sure that the pin is not driven past the flush to body point. This will ruin the frame so please take care when doing this particular step.
Step 13
Tested loose trigger action to make sure everything moved smoothly
Step 14
Installed battery, plug in switch harness, grips and Re-installed trigger frame to main body.
Step 15
Re-installed bottom line to ASA.
Step 16
Powered up and gassed up marker.
Step 17
Checked for leaks.
Step 18
Tested marker in safe zone.
Conclusion: This trigger is awesome! it is 50 gram switch which will work just fine without the trigger spring installed. With this trigger switch installed it was much easier to walk the trigger on "Spiker" our test platform marker. With the first test run Spiker performed well. On the second one we had to re-open the grip and double check the plug in on the switch harness. A little wiggle to seat it all the way down and we were on our way. Now this trigger will not make you an overnight machine gunner. But it will be close. You will still have to practice with the trigger to get the feel for it. First test run Spiker did 15 BPS. Incredible results we think for the measly $5.50 it cost us.
One last insane trigger mod…….
As a final touch we are presently testing out setting up the marker to fire once and pull and once on release. Effectively getting two shots for the same action as one. While this is completely illegal for tournaments and also at some fields it will prove to be quite the asset in outlaw woods ball. This last mod makes use of a pressure switch to activate the circuitry and a jumper using the open tab on the trigger switch. We will post the mod here once we can get reliable results from it and can fully explain how this last piece of voodoo works. Because of stock board limitations we may hit the limit of what the board can do. Official word from Kingman International is that the stock board is uncapped in semi auto mode with the tourney lock on (jumper removed). We will see and let you know.
Keep it real, keep it safe
Posted in News | No Comments »POTATO GUN DISCLAIMER
Before you proceed to any of the links
below we must repeat we are not responsible for any damages
that occur to you or your stuff buy using any of the information
provided here. These spud launchers are potentially dangerous.
Using the wrong fuel or the wrong pressure could result
in a permanent addition to your skull of schedule 40 PVC
pipe. Not for the faint of heart. Many of the projectiles
that you will send flying with these you will never see
again. If you blow stuff away including your head then it
is your fault and not ours nor the responsibility of the
sites listed below. Always treat a pneumatic canon with
care. Treat it as you would treat a loaded gun. Many of
these are capable of sending a projectile through multiple
pieces of 3/4" ply wood! Never fire these at an individual.
These are meant to be an indirect means to deliver a paintball
grenade to a target you can't walk to.

If the thought of firing a poor potato into a hard surface
and having it disappear completely then these links are
for you.
Some of these plans could be adapted to
fire paint mortars of various types. Please use your head
and keep researching before you build your first one.
If you do not have a solid understanding
of the construction materials and how to work with them
in a spud launcher then PLEASE!!! don't attempt to make
any of these.
 Check
Check
out the B.E.C.C. (Breach Loaded. Electro-Pneumatic.
Constant Air. Canon) This thing is constant air powered
by CO2. B.E.C.C.
web site.
The design is fairly elaborate, however
it performs again and again consistently.

What is a SpudZooka? It is a device that
is capable of launching a potato several hundred yards.
You may have heard it called a Spud Gun, Potato Launcher,
Potato Cannon, but it’s all the same. Pneumatic cannons
are nothing like the old combustion style. In power, there
is no comparison.
Do you know of a spud launcher that should
be on our page? Send us an e-mail
and we will give it a look. Please don't send us links to
dangerous stuff like non-pneumatic canons because we will
not post them here.
Potato Gun Video
Tippmann A-5 Review

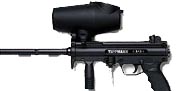
Update! Tippmann has now dropped the price of the A-5 to only $199.00 - Brand new
Specs:
- .68 caliber
- semi-automatic
- 15+ BPS
- 8.5 stock barrel
- 3.5 lbs
Looks:
Modeled after the MP5K submachine gun by Heckler & Koch, stock with forward grip. This grip can be removed to attach other under mounted accessories. I think the marker looks pretty cool myself, and of course, lends it self extremely well to cosmetic modification to whatever the owner desires. Cost is the only limit.
Weight and Balance:
The A5 is a heavy little guy in my hands, weighing in at 3.5 pounds before any modification. Even with a stock, my marker tends to be very front heavy. Especially as you add mods to the marker, this thing becomes a beast. However, the low profile of the Cyclone Feed System and its hopper avoids the wobbly-off-balance feeling I get from my MR2 and its Halo B hopper.
Reliability:
This is of course, where the A-5 shines. The marker has been branded by the well-known Tippmann brand. That alone will tell you a few characteristics about the gun if you know about their past reliability.
First, its Cyclone Feed System positively feeds paintballs into the breech via a 5-cell fan-looking mechanism that all but eliminates ball chopping (*unless you have a really bad football or super greasy balls....didn't that last one just sound great?*). The Cyclone itself is well made, although older A5's have a problem with the internal ratchet wearing out after time, a $1.50 replacement and ten minutes worth of work from Tippmannparts.com
The rest of the marker in incredible for its ruggedness, in part due to it having no electronic components stock. I have banged mine off of trees at high speed, had it fly out of my hand and skid ten feet away when I fell, and played for an hour in heavy rain and never had this marker cease functioning.
Stock attaches securely into the rear of the marker and held in place with pressure and two push-pin bolts. Some stock users, especially the DogLeg users, have had problems with these rear push pins shearing from the stress of stock use. I use a folding stock on mine and have had no problems.
Maintenance:
A two edged sword! On one hand, this is a very easy marker to get along with due to its reliability above. I used to take my marker down after every single game, and noticed all I was doing was cleaning a bit of CO2 residue from the internals. I now take it fully down every 3rd game, or when I have played in the rain or taken hits that might gum up the marker like direct down the barrel.
On the other hand, the A-5 sucks to take down to non-moving parts, unlike say a Kingman Spyder. Four push pins and a half dozen or so machine screws need to be removed, and there are several springs to come popping out on the unwary user. The internals are mostly intuitive, although the user manuals exploded diagram comes in very hand the first couple of times stripping the marker.
My main aggravation is the tombstone latch and spring being under fairly high pressure so it pops out and across the room at times, and the charging-handles spring is much longer than its guide bevel, requiring steady hands to keep it in place while the marker halves are put back together.
Upgradeability:
Simply incredible. This marker has the most aftermarket accessories than any other marker, maybe even three ![]() A bewildering array of stocks, barrels, shrouds, internals, grips and other mods are available for it. It comes with a 3/8" dovetail rail on its top for mounting Weaver rails and optics, and again, the front fore grip can be removed to add additional accessories.
A bewildering array of stocks, barrels, shrouds, internals, grips and other mods are available for it. It comes with a 3/8" dovetail rail on its top for mounting Weaver rails and optics, and again, the front fore grip can be removed to add additional accessories.
The only problem here is price! It is easy to go crazy adding modifications, and each will add to the weight of the marker.
I run a Low Pressure Kit and Palmer Fatty regulator as the main mods on mine, with an OPSGEAR MP5K-PDW folding stock and a BT Apex or 20" SmartParts Tactical barrel. Also added a SwatForce red dot sight on a JCS offset rail and love the hell out of the package!
Function:
First and foremost this is a loud and hungry marker! Operating at about 800PSI internally without modification, the A5 eats up CO2 like a dog eats dinner dropped on the floor. Additionally, the signature BOOM BOOM BOOM of an A5 cannot be mistaken. My LPK + Regulator help out with this a lot. I now get 700+ shots on a 9oz CO2 and the marker has been quieted substantially.
The marker is easy and intuitive to use. However, the safety on the grip pushes to "hot" rather easily if you don't watch your hand placement.
The Cyclone uses exhaust gas from your propellant to function, so when that tank begins to run dry, the Cyclone might cease to function. There is a push plunger that allows manual advancement of the Cyclone and feeding of paintballs in case of this, but in general practice, once it stops functioning, you are just plain done.
I do not run full auto with mine but I have heard that the Cyclone will run out to about 17 balls per second off of a Response Trigger or E-grip without further modification. Standard trigger has a relatively heavy trigger pull and gets around 4-6 bps semi auto without modification.
Accuracy of this marker is very dependant on barrel choice. The stock barrel is fine for close quarter combat of 50 feet or so, but if you plan on shooting at longer distances, or trying to knock over soda cans, a good replacement barrel is a must.
I also like the fact that the Cyclone Feed System and its hopper are very low profile, far lower than most other markers.
Miscellaneous:
I really like this marker:) Reliability is my first priority in all equipment I buy, and it definitely has that down pat! I also am very keen on the fact that I can buy one marker and interchange accessories to make it a sharpshooter, general purpose, close and fast, or whatever else I so desire.
The paintjob is annoying, mine is scraped and bubbled off on many places and will require a new paintjob very soon.
This is an excellent marker for just about any sort of play, and definitely one well suited to the rough-and-ready nature of woods ball play. I doubt you will be disappointed if you get the Tippmann A-5!
Thanks to arclight642 at SpecialOpsPaintball.com for the review
FunnyTippmann A-5 Paintball Gun Video
How to Clean/Disassemble your Tippmann A-5 Paintball Gun Video
|
Tippmann A5 Paintball Gun US $250.00 |
TIPPMANN A 5 CAMO PAINTBALL GUN W ACCESSORIES US $102.50 |
|
Tippmann Paintball Gun A 5 US $275.00 |
Tippmann A5 Paintball Gun Package US $100.00 |
|
NEW JJ 14 SNIPER BARREL 4 TIPPMANN GUN X 7 BT 4 A 5 A5 US $6.50 |
 Buy New & Used Paintball Guns